Stop Tags
“Stop Tags,” in quotes, because this term is nothing more than a convention of using a client tag. A “Stop Tag” is the concept of creating client tags which will be used to remove clients from a specific automation or automation sequence.
If you’re asking:
- How do I prevent a specific client from this automation without opt-ing them out?
- If a client lets me know they’re not interested in joining, how can I stop the remainder of my intro offer automations?
This is where the “Stop Tag” comes into play.
Before reading on, make sure you already have an understanding of:
What is a stop tag?
A “stop tag” is just a client tag that is used to remove a client from a specific automation, or sequence of automations.
Two things are required for a “stop tag” to work:
- The automation(s) you want to prevent the client from receiving must have the filter:
Client Tag does NOT have = [whatever tag you’re using for this automation] - The tag has to be present in the client’s profile
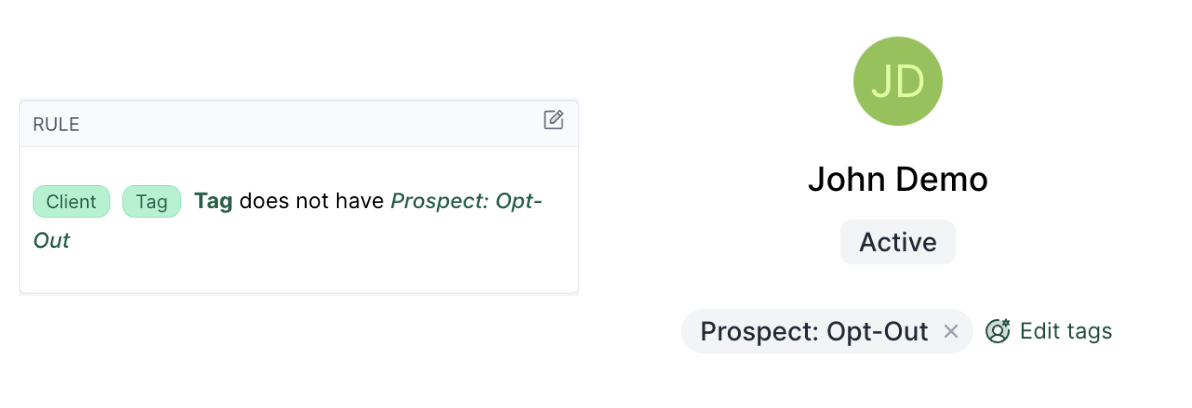
The example above would NOT enter the segment on the left (or trigger any automation with this rule, because):
- The segment contains the filter
Client Tag does NOT have = Prospect: Opt-Outand - The client’s profile in LoopSpark contains the tag
Prospect: Opt-Out
What automations need a “stop tag”
Automation Sequences
Any automation category that spans more than one day, such as:
- Lead Sequence
- Prospect Sequence
- Intro Offer sequence
- Membership Sequence
Each one of these automation sequences contain multiple automations spanning multiple days, and should have a dedicated tag (filter: Client Tag does NOT have) providing you with an option to remove a client from the remainder of those automations (by applying that tag to the client’s LoopSpark profile).
Consider this scenario: You’ve emailed and texted a prospect a few times, and they respond:
“I’m interested in getting started, but I can’t start for another 2 weeks.”
“I can’t start for another 2 weeks” is a great example of data that:
- Doesn’t exist in your booking software, and
- Would make additional prospect automations seem unprofessional and annoying
Hopefully all of the automations in your Prospect Sequence contain the filter Client Tag does NOT have = Prospect: Opt-Out making it easy to prevent this client from triggering additional prospect automations by adding the tag Prospect: Opt-Out to their client profile in LoopSpark.
Recurring Automations
Any automation that might trigger more than one time for the same client, such as:
- Appointment reminders
- Lapsing Client
- Lapsed Client / Win-back
- Class Pack running low
Consider this scenario: You’ve setup automations to trigger when active members are absent for 7, 14, 21, and 30 days. A client receives your SMS on day 7 and tells you they’ll be on vacation for another month. Again, it would be a poor customer experience (knowing the customer is on vacation and can’t attend) to send another follow up in 7 days saying “we miss you, can we get you scheduled this week”?
Just one more scenario highlighting the value of setting up automations correctly with “stop tags” before we move on.
Scenario 2: You have an automation setup to send appointment / private session reminders 1 day before a scheduled appointment. The client lets you know they don’t want to opt-out, but don’t want to receive this message every time they book an appointment. Again the solution is: “stop tag”
Designing your stop tags
You might notice that automations pushed into your account during your onboarding process, and automations in the LoopSpark Automation Catalog all have dedicated stop tags per category.
Having a standardized syntax for stop tags will make it much easier for staff members to know what tag will stop certain automations. We recommend:
- [Automation Category]: Opt-Out - such as
Prospect: Opt-outor - [Automation Purpose]: Opt-Out - such as
Appointment Reminder: Opt-Out
When searching the tag dropdown menu in a client profile, your staff can simply search Opt-Out and quickly find the tag that would work best.
Automation Sequences
Take a look at all of your current (and planned) automated sequences. You can visit your automation list and scan your automation categories. Any automation that has multiple touch points should have its own unique stop tag.
Below are a few common category names, and suggested “stop tags” for each category:
- Leads -
Lead: Opt-Out - Prospects -
Prospect: Opt-Out - First Visit Confirmation -
First Visit Confirmation: Opt-Out - First Visit Missed -
First Visit Missed: Opt-Out - First Visit Follow-up -
First Visit Follow-up: Opt-Out - Intro Offer -
Intro Offer: Opt-Out - Membership -
Membership: Opt-Out - Lapsing Client -
Lapsing client: Opt-Out - Win back -
Win Back: Opt-Out
Once you’ve mapped out what your tags should be, the next steps will be:
- Create these tags
- Make sure all automations in a specific category have the filter
Client tag does NOT have = [whatever your stop tag is]
Recurring Automations
Filter your automation list by Type: Continuous
Any continuous automation that could trigger multiple times for the same client should be considered.
Automations to remove tags
It might be helpful to setup automations that remove tags after a specific amount of time.
An easy example would be removing the tag Pregnant after 9 months, as the tag itself would no longer be relevant.
We’ll focus on removing a stop tag after a specific amount of time, but keep in mind these automations can be setup to remove any tag.
Consider a scenario posed above: Your client receives a “we miss you” SMS after 7 days of absence and tells you they’ll be on vacation for another month. Your staff adds the tag Lapsing Client: Opt-Out to their profile to ensure the client doesn’t continue to receive these messages during vacation. BUT, you want that client to receive these automations again in the future.
Your Lapsing Client automations span 30 days following a clients most recent visit, so safe to say if the tag is removed 30 days after it’s applied to a profile, the client would have to attend again to trigger re-enter the automation sequence.
You can setup automations to remove tags. Here’s the basic breakdown:
Create a new automation: https://app.loopspark.com/automations/create
Step 1: Settings
- Automation Action = tag
- Automation Type = continuous
- Delivery Window = Send Anytime
Step 2: Audience
Your audience will use 2 filters:
Client tag: we’ll select the tag to be removed
Client tag assignment date: we’ll decide how long after being applied to a client’s profile the tag should be removed.
Using the example of removing the tag Pregnant our audience would be:
Rule (contains 2 filters):
Client tag= HASPregnantClient tag assignment date= NOT in the last 270 days
In other words, it the tag Pregnant has been in a client’s profile longer than 270 days, remove it.
Going back to the Lapsing Client scenario. Your sequence spans 30 days, and you’d like to remove this tag if present in a client’s profile longer than 30 days. Your audience would be:
Rule (contains 2 filters):
Client tag= HASLapsing Client: Opt-OutClient tag assignment date= NOT in the last 30 days
Step 3: Tag
The action you’ll take is remove tag and the tag you’ll want to remove would be the one in your audience (step 2 above).
Using the Lapsing Client example, you’d select Remove Tag: Lapsing Client: Opt-Out
Best Practices
After you’ve mapped out your stop tags and ensured all of necessary automations have the appropriate filter to remove anyone with that tag, write this list down and train your staff!
The “stop tag” concept is not meant to stop an opportunity, it’s meant to stop a specific set of automations from triggering for a specific client.
Often times you’ll want to stop the automation, but add a reminder to manually pickup the conversation.
- Step 1: Apply stop tag to client’s profile (stopping automation(s))
- Step 2: Add a To-Do in the client’s profile reminding staff to reach out at the appropriate time.
Using the Prospect scenario above, you want to make sure you stop sending prospect automations to someone that lets you know they cannot join for another 2 months.
- Step 1: Apply your prospect stop tag to the client’s profile
- Step 2: Schedule a To-Do in the client’s profile for 2 months from now to reach back out to the prospect and see if they’re ready to join.
Train Staff
Let your staff know how a stop tag works, why they’re important, and how your staff will use them. Share this helpdoc with your staff! Once they understand how to apply a “stop tag” and which tags stop which automations, role play a bit.
“I’m a prospect that responds to a text letting you know I cannot join for another 2 weeks. How would you prevent me from triggering any additional Prospect automations”?
- Step 1: Locate my client profile and add the tag
Prospect: Opt-out - Step 2: Schedule a To-Do for 3 weeks from now to call me and ask if I’m ready to join, and remove the
Prospect: Opt-Outtag from my profile so I can re-enter the Prospect sequence