To-Dos (Tasks)
Creating To-Dos - Video Walkthrough
Streamline tasks with automated To-Do lists. To-Dos help manage manual tasks related to clients, including celebrating club counts, personal follow up calls, hand written communications and more.
Creating To-Dos
To-Dos are created in 2 ways:
- Through a To-Do Automation.
- Creating a To-Do directly from a client profile.
To-Do automations
- Click Automation -> Create to begin setting up your new automation.
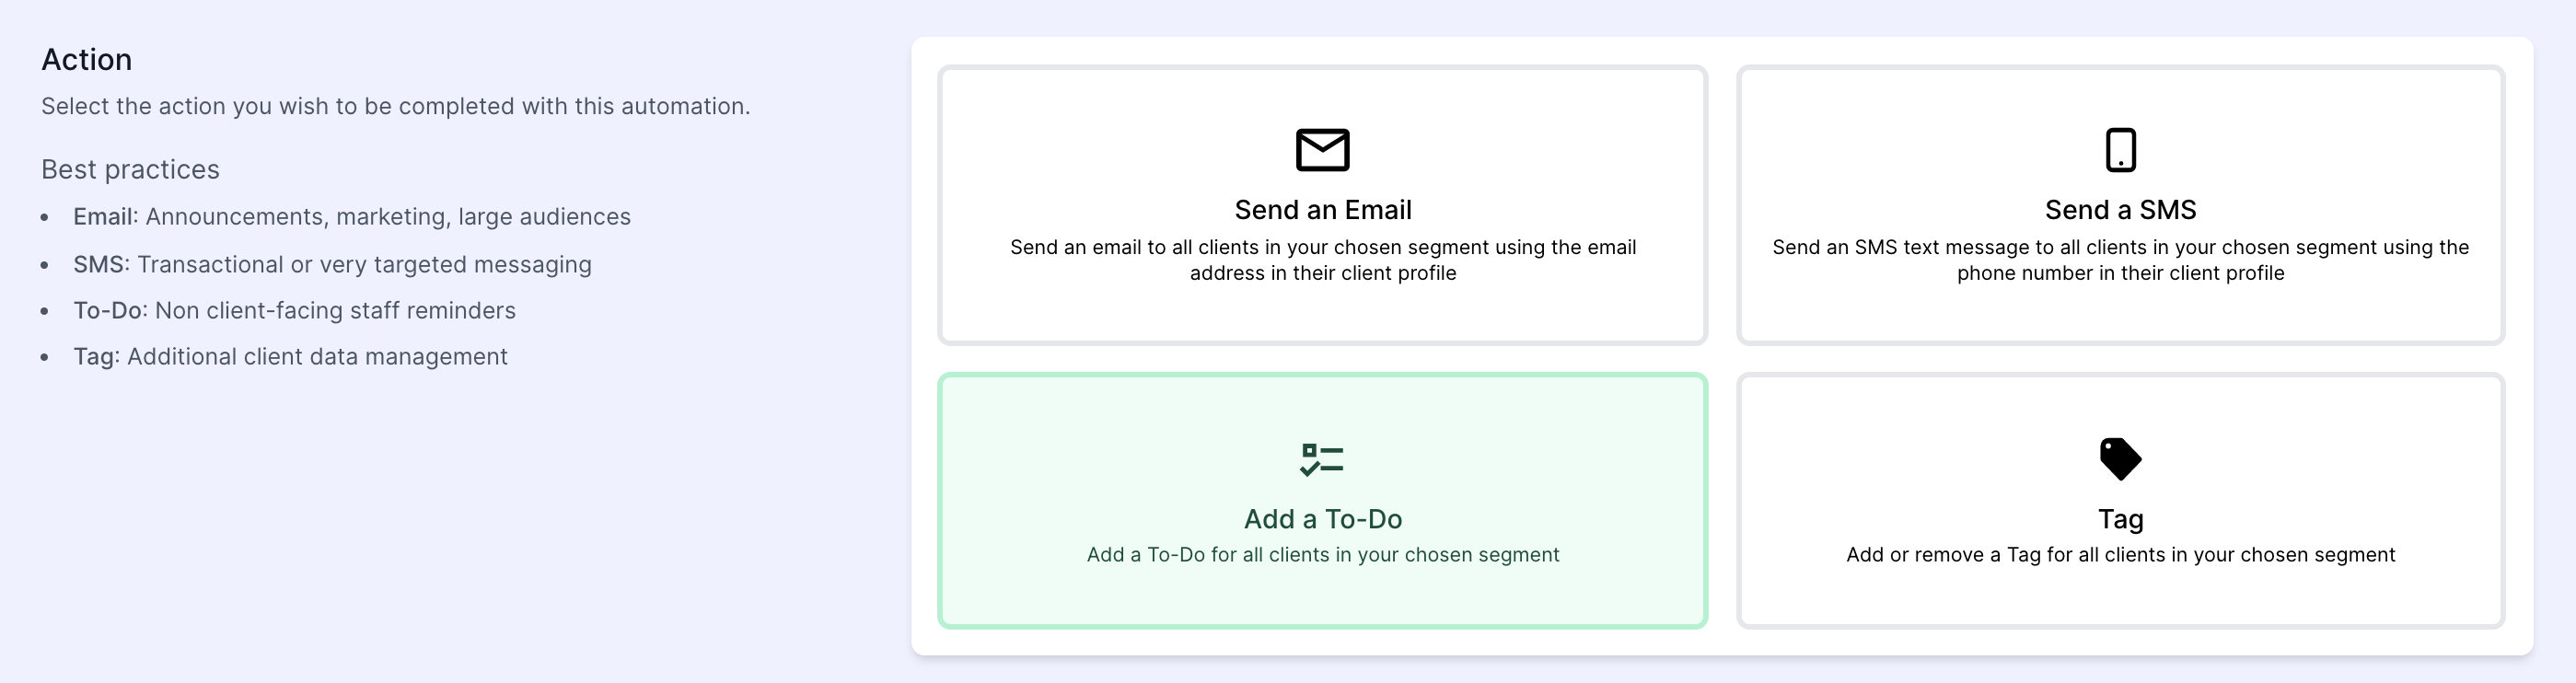
- In the first step of the automation wizard,
SettingsselectAutomation ActionTo-Do
To-Do automations
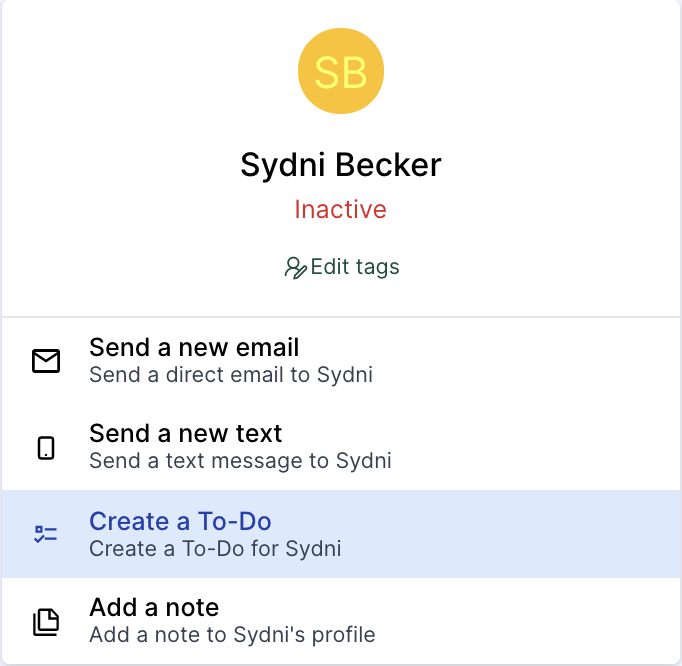
- Within a client profile, click the action item
Create a To-Dolocated below the client’s name. - Fill out your To-Do
- Save your To-Do by clicking the green
Create!button.
Elements of a To-Do
Creating an effective To-Do will require understanding the basic elements to schedule, assign, filter and streamline To-Do completion.
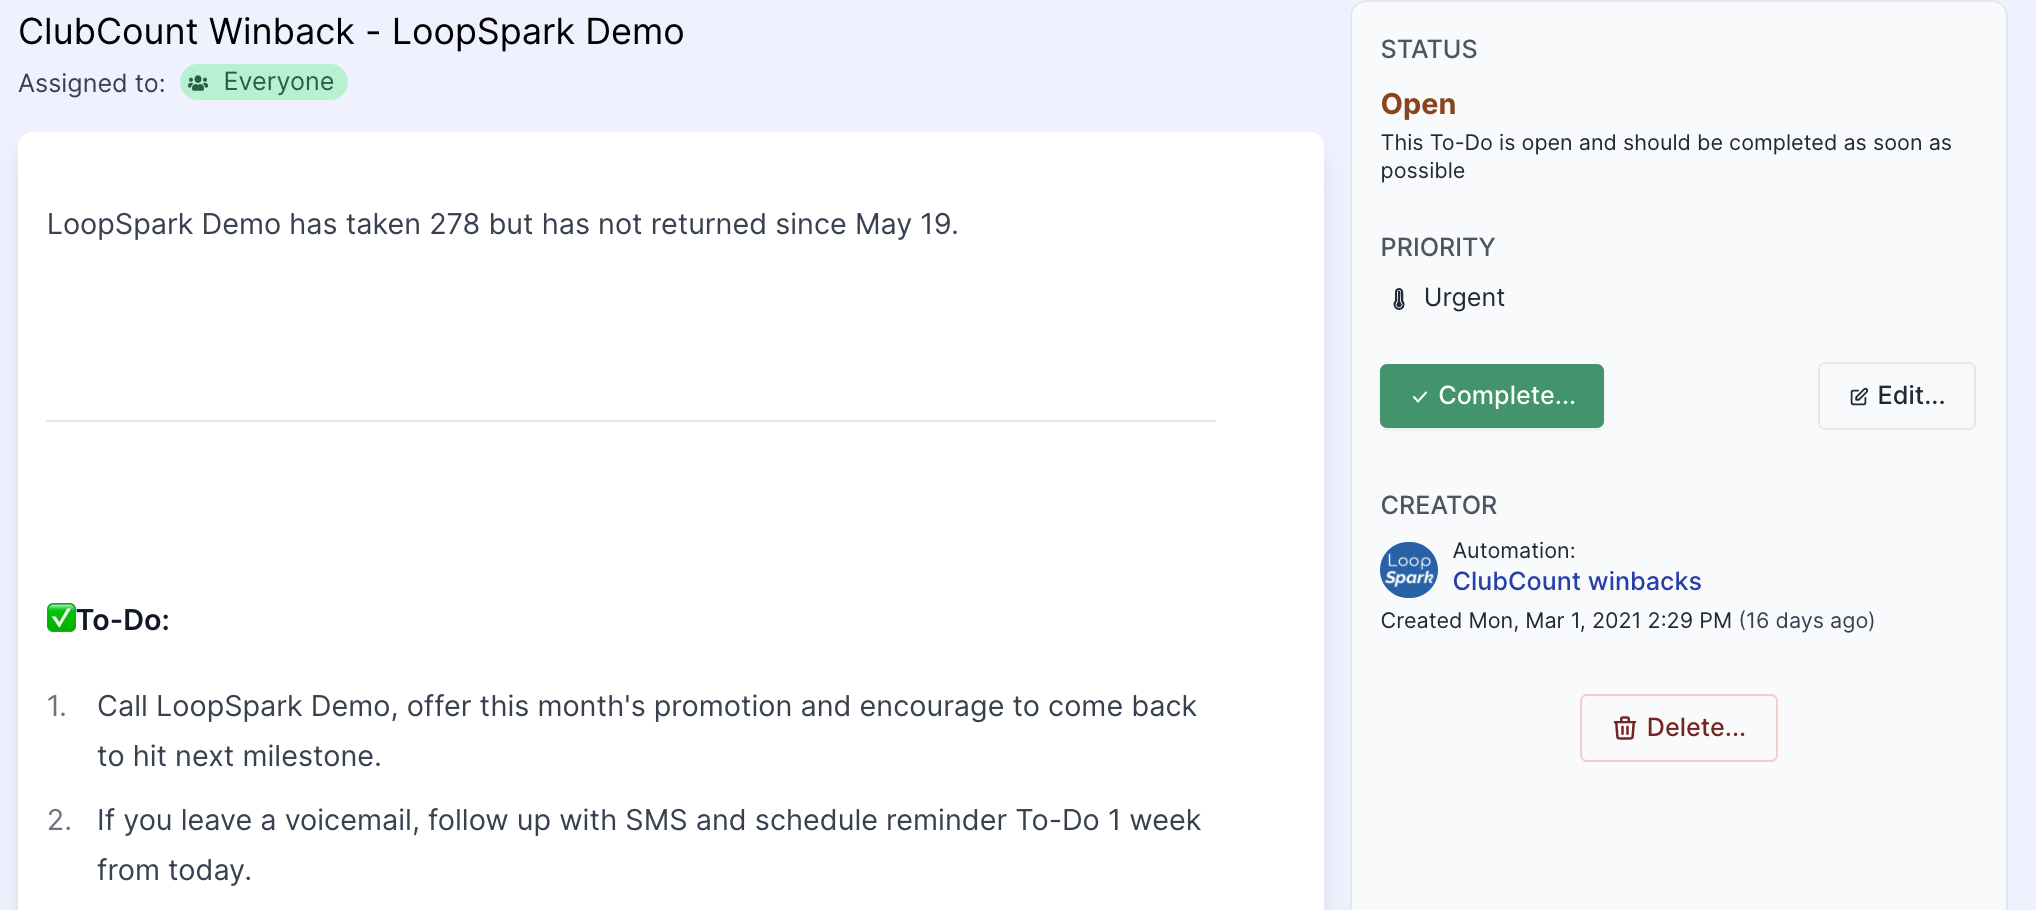
- Title
- Content
- Priority
- Tag
- Overdue
- Schedule
- Assigned to Member
- Assigned to Group
Title
Adding personalized details in a To-Do title will help your staff better manage and prioritize their task list.
Example: You’re creating an automated To-Do to alert staff members of clients attending your business for the first time today. This to-do will help staff greet the client, introduce them to their instructor, other members, and setup the up for the best first experience.
Effective To-Do Title: {{FIRST_NAME}} {{LAST_NAME}} - First Visit today @ {{NEXT_VISIT_TIME}} with {{NEXT_VISIT_TEACHER_NAME}} {{NEXT_VISIT_TEACHER_LAST_NAME}}
Ineffective To-Do Title: Client attending first visit today
To-Do Content
To-Do content, especially for automated to-dos, will help your staff quickly understand.
Elements of a good To-Do include:
- Purpose of the To-Do
- Step by step instructions of what your staff needs to accomplish
- Prompting your staff to check client profile information before taking action to ensure To-Do is still relevant.
- Phone Scripts (for To-Dos related to phone calls)
- Voicemail Scripts (for To-Dos related to phone calls)
- Pre-populated follow up SMS and/or Emails (incase staff receives voicemail)
IMPORTANT: To-Dos do NOT automatically delete
To-Dos do not automatically delete themselves, so it’s important to add instructions for your staff to check client profile information before calling a client, depending on the purpose of the To-Do
Example: Call client that has never scheduled their first class. If this To-Do is created and not immediately completed by a staff member, it’s possible the client already attended their first class AFTER the To-Do was created.
To avoid confusion for your staff (and client) make sure to include instructions in the To-Do such as “check client profile to make sure they have not already visited before calling. If client has attended, delete To-Do”
Priority
To-Dos can be prioritized to help your staff focus on To-Dos of greater importance.
You can set a To-Do priority as:
- Low
- Medium
- Urgent
To-Dos can then be filtered on the To-Do page by priority.
Tag
Tags can be added to individual To-Dos, or automated To-Dos to provide further filter ability. You may want to add tags to To-Dos to allow staff members to filter their To-Do list by common types of initiatives, such as:
- Sales
- Client Celebration
- Membership
- Prospect Outreach
- Introductory offer
To-Dos can then be filtered on the To-Do page by associated tag.
Overdue
To-Dos can be set to become overdue if they have not been closed after a defined period following To-Do creation. Adding overdue parameters to a To-Do will help your staff work on overdue tasks before moving on to new tasks. This will help ensure no To-Do remains unattended for a long period of time.
To-Dos can then be filtered on the To-Do page by overdue, and will be marked with an overdue date.
Schedule
To-Dos can be scheduled in 3 ways:
- Right Away - To-Do will immediately populate in To-Do page
- Postponed (automated To-Do only) - To-Do will populate on To-Do page X days after automation triggers its creation
- Schedule For (manual To-Do creation through client profile only) - To-Do will populate on To-Do page on defined date and time.
Assigned to Member
Both automated and client specific To-Dos can be assigned to specific staff members. Automated To-Dos using this feature will assign each to-do created by the automation to the selected team member. Staff assignment can be edited after the to-do is created in order to re-assign specific To-Dos to other staff members.
To-Dos assigned to a specific staff member will provide easier filtering on the To-Do page, as well as higher visibility to that staff member on their Dashboard
Assigned to Group
Staff members can be assigned roles by administrators using the Manage Groups feature (available to studio owners and managers only). Similar to assigning a To-Do to a specific staff member, To-Dos can be assigned to a group of staff members. This will allow you to assign To-Dos to a group of staff members for easier filtering on the To-Do page, as well as higher visibility to those staff members on their Dashboard
Common Role Groups:
- Manager
- Sales Manager
- Front Desk
- Trainer
- Owner
Completing, Deleting, and Editing To-Dos
Once a To-Do is created, it can be marked as completed , deleted or edited to add notes, re-assign to another staff member or role, or updating the scheduled date.
Completing:
Through Client Profile
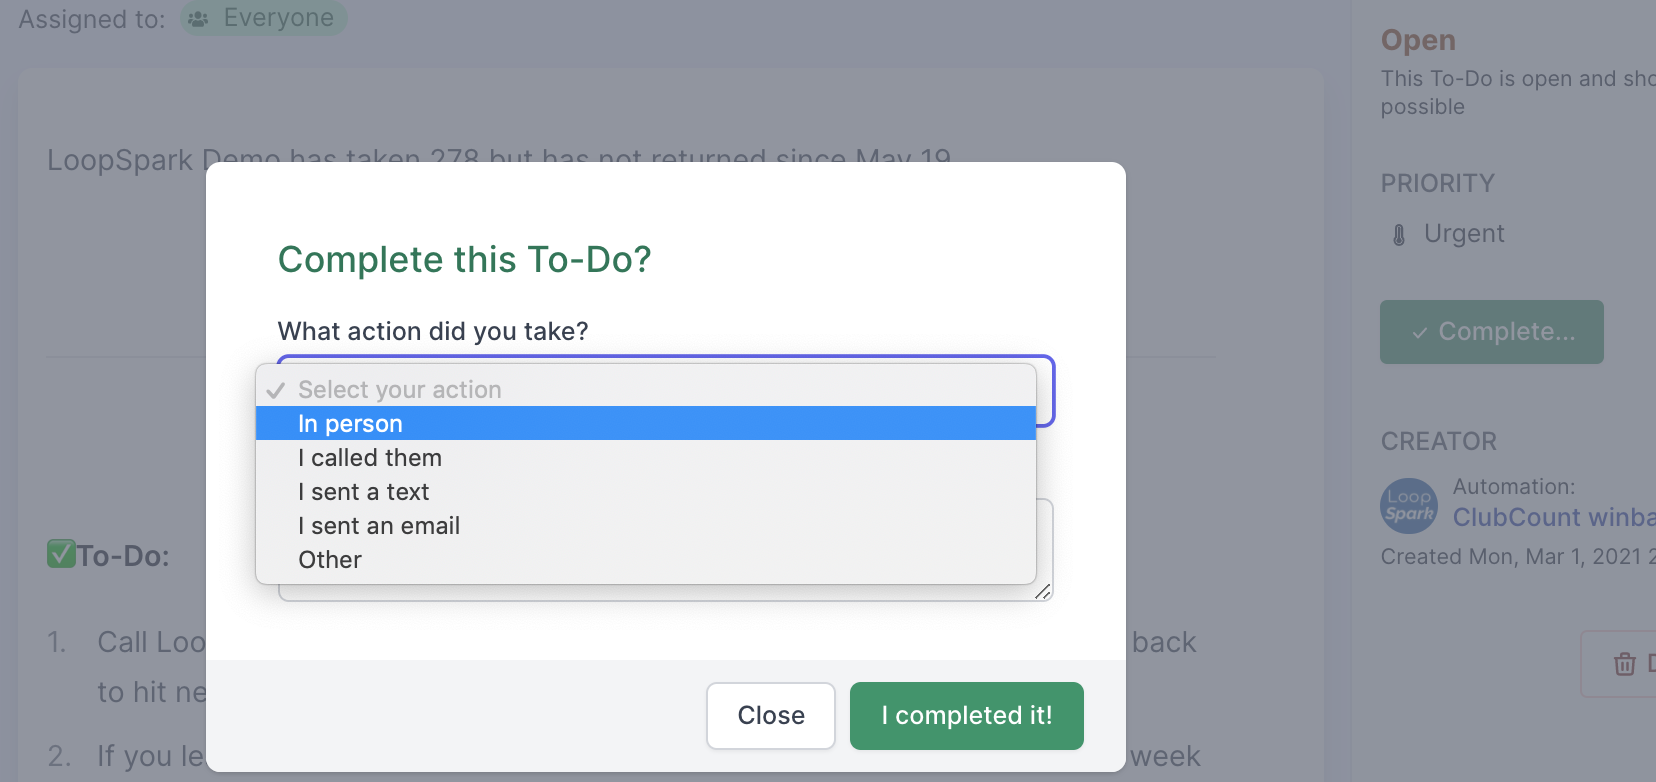
- Click the
completebutton on the right side of a To-Do - Select the action taken to complete to-do
- Add optional notes
- Click green button `I completed it!
Through To-Do nav-bar tab
- Click on ToDos in the top nav-bar
- (optional) Filter the To-Dos you’d like to mark as completed
- Select a To-Do or multiple To-Dos to mark as completed
Mass completing through To-Do nav-bar tab
Access Level Restriction: Only available for Admins and Owners

- Click on ToDos in the top nav-bar
- (optional) Filter the To-Dos you’d like to mark as completed
- Click the 3 dots located on the upper left corner of the To-Do list
- Click
Complete alland confirm the number of To-Dos you’ve filtered matches the number of To-Dos listed to mark as completed
Deleting:
Through Client Profile
- Click red button
deleteon right side of a To-Do - Confirm deletion by clicking
Yes, delete it!
Through To-Do nav-bar tab
- Click on ToDos in the top nav-bar
- (optional) Filter the To-Dos you’d like to mark as completed
- Select a To-Do or multiple To-Dos to mark as completed
Mass deleting through To-Do nav-bar tab
Access Level Restriction: Only available for Admins and Owners
- Click on ToDos in the top nav-bar
- (optional) Filter the To-Dos you’d like to delete
- Click the 3 dots located on the upper left corner of the To-Do list
- Click
Delete alland confirm the number of To-Dos you’ve filtered matches the number of To-Dos listed to delete
Edit
- Click the
editbutton on the right side of a To-Do - Edit the content, assignment, priority, schedule date or assignment
- Save edits by clicking green button
edit
To-Do List

The To-Do list, located in your LoopSpark top nav-bar, will appear with a badge icon indicating the number of open to-dos across your entire location.
The To-Do list presents a quick snapshot of important information for your team’s workload, including client name, to-do subject, assignment, status, and creation date.
This page will allow you and your staff to quickly filter, sort, and work on open and over-due to-dos, as well as view scheduled and completed to-dos.
In addition to granularly filtering your to-do list for effective productivity, you can use the various filters to mass close or delete to-dos.
To-Do list filters

Below is a list of available filters which can used in combination to effectively triage overdue to-dos, work on specific initiates, filter by assignment, or filter your list to quickly mass complete or mass delete to clean up your list.
- Status: Filter your list by
Open,Overdue,Scheduled, orClosedstatus of your To-Dos. - Assignee: Filter your list by To-Dos assigned to a specific staff member.
- Automation: Filter your list by To-Dos that were generated from a specific To-Do automation.
- Priority: Filter by status of To-Dos:
All,Urgent,Medium, orLow - Assigned Group Filter list by Role Group assignment.
- Creation Date: Filter list by date To-Do was created, allowing you to quickly work on older to-dos, focus on newly created to-dos, or mass complete or mass delete to-dos based on create date frames.
- Overdue Date: Filter list by date To-Dos were marked as overdue, allowing you to quickly prioritize outstanding to-dos, and mass complete or mass delete to-dos based on relevancy by overdue date frames.
To-Do list order
In addition to filtering your to-do list, you can select how many to-dos are presented in a single to-do list page, and select the order in which your to-dos are presented, further enabling your team to quickly prioritize their workload.
- Last Updated: Order your To-Dos by most recently updated.
- Creation Date: Order your To-Dos by most recently created.
- Overdue Date: Order your To-Dos by most most recent over-due assignment date.
Tracking To-Dos
Tracking the completion or deletion of a task can be found in 2 places, a client profile and in the automations page.
What’s being tracked
- Creation Timestamp - This is the time a client enters your automation segment and triggers the creation of a to-do task
- Completion Time - This is when you or a staff member marked the task as
doneordeleted. - Staff Member who completed the task - Whoever marked a task as
doneordeletedwill be listed next to the task. - Status - A To-Do item can either be
open,closed,deleted, orscheduled
Where can I view To-Do?
To-Dos will be visible in 4 places:
- Client Profile - A blue badge will appear on the
To-Dotab of a client profile indicating the number of open To-Do items related to this client. - To-Do page - A list of all To-Dos will be visible for all staff members to view, easily filterable by: Open, Overdue, Scheduled, Manually Created, Closed, Automation that created To-Do, Tag, Assignee (staff member or staff role group), Home location of client (for multi-unit owners).
- Dashboard - To-Dos assigned directly to a staff member, or any role group assigned to that staff member will be visible on the staff member’s dashboard.
- Automations List - A list of all To-Dos created by an automation will be listed with the status, creation date and closed date.